
Move in and out checklist: Essential landlord-tenant guide
- Sarah Porter

- Nov 16, 2025
- 18 min read
The transition between tenants is a critical, high-stakes period for any rental property owner or manager. A poorly executed move-out or move-in can quickly spiral into financial loss, property damage, legal disputes, and a tarnished reputation. The key to avoiding these pitfalls isn't luck; it's a meticulously planned process. A comprehensive move in and out checklist acts as a foundational tool, creating a clear, documented, and transparent framework that protects both the landlord's investment and the tenant's security deposit. It transforms a potentially chaotic event into a predictable, manageable business procedure.
This guide provides more than just a simple list of tasks. We offer a dual-perspective toolkit designed specifically for rental professionals. Inside, you will find actionable checklists for both landlords and tenants, detailed inspection guidelines with photo documentation best practices, and templates for property condition reports. We also provide timelines, crucial communication scripts to manage tenant expectations, and a breakdown of security, cleaning, and repair protocols. Our focus is on mitigating risk, streamlining the turnover process, and fostering positive landlord-tenant relationships through clear communication and documentation. While many resources cover general relocation tasks, such as this Ultimate Residential Moving Checklist, our guide dives deep into the specific needs of the rental industry.
By implementing the strategies and using the downloadable templates provided, you can ensure every turnover is smooth, efficient, and dispute-free. Let's dive into the essential steps that will help you master the rental transition, protect your assets, and set the stage for a successful tenancy from day one.
1. The Dual-Perspective Move-In Checklist: Setting the Stage for Success
The move-in inspection is your first and best opportunity to prevent future security deposit disputes. Moving beyond a generic, landlord-only form is critical. A dual-perspective move-in checklist creates a shared, agreed-upon record of the property’s condition from day one, serving as a powerful legal and relational foundation.
This approach transforms the inspection from a simple administrative task into a collaborative process. Both landlord and tenant walk through the property together, noting the condition of every room and feature. This shared experience builds trust and ensures both parties are literally on the same page.
How to Implement a Dual-Perspective Checklist
The core of this strategy is using a detailed move in and out checklist that has columns or sections for both parties.
Landlord/Manager Column: You complete this section before the tenant arrives, noting the condition based on your professional assessment (e.g., "Carpet - professionally cleaned, no stains," "Walls - freshly painted, no scuffs").
Tenant Column: During the joint walkthrough, the tenant adds their own observations directly to the form (e.g., "Small, faint stain noted near the window," "Minor scuff mark behind the entry door").
Photo/Video Documentation: Both parties should be encouraged to take photos and videos of any noted imperfections. These visual records, timestamped and linked to the checklist, provide indisputable evidence.
Key Insight: The goal isn't to find every flaw, but to create a transparent, mutually-agreed-upon baseline. This collaborative document, signed by both landlord and tenant, becomes an official addendum to the lease agreement, making it a legally binding record of the property's initial state.
2. Declutter and Downsize Your Belongings
While this step often falls on the tenant, guiding them through a decluttering process is a proactive measure for landlords. A streamlined move reduces property damage risk, shortens the moving timeline, and sets a positive precedent for how the tenant will maintain the space. It transforms the move from a chaotic transfer of items into an intentional fresh start.
This process involves systematically sorting through possessions to decide what is truly necessary for the new space. Encouraging this step helps tenants reduce moving volume and costs, but it also benefits you by ensuring a smoother, quicker, and less cluttered move-in day, minimizing the chances of scuffed walls or damaged floors from excess furniture.

How to Implement a Decluttering Strategy
The key is to provide simple, actionable advice to your incoming or outgoing tenants, framing it as a mutually beneficial step in the move in and out checklist.
The Four-Box Method: Advise tenants to set up four distinct areas or boxes labeled: Keep, Donate, Sell, and Discard. Every item must be sorted into one of these categories, forcing a decisive action.
The "Two-Year" Rule: Suggest a simple guideline: if an item hasn't been used in two years (excluding seasonal or deeply sentimental items), it's a strong candidate for donation or sale. This pragmatic approach removes emotion from the decision.
Resource Recommendations: Provide a list of local resources like Goodwill donation centers, consignment shops, or links to platforms like Facebook Marketplace and OfferUp. This makes it easier for tenants to follow through.
Key Insight: Facilitating a tenant's downsizing is an act of proactive property management. It not only ensures a more efficient move-in but also subtly encourages a more organized and respectful approach to living in the property from the very beginning.
3. Notify Institutions, Change Address and Arrange Mail Forwarding
A seamless transition between properties involves more than just packing boxes; it requires a systematic update of your personal and professional information across various institutions. Neglecting this crucial step can lead to missed bills, delayed important documents, and potential security risks. For both landlords and tenants, ensuring a smooth administrative handover is a key part of any comprehensive move in and out checklist.
This process involves creating a master list of every organization that holds your address and methodically updating each one. It's a proactive measure that prevents the chaos of lost mail and service interruptions, ensuring continuity from day one at the new property.
How to Implement a Systematic Address Update
A structured approach ensures no critical institution is overlooked, from government agencies to subscription services.
Official Mail Forwarding: Start by setting up official mail forwarding with the USPS (or your country's postal service) at least one to two weeks before your move date. This acts as a safety net, catching any mail sent to your old address while you update individual accounts.
Create a Master Checklist: Categorize your contacts: financial (banks, credit cards, investments), government (IRS, DMV, Social Security), utilities, insurance (health, auto, renters), healthcare providers, subscriptions, and employers.
Update Systematically: Tackle one category at a time. Use online portals and apps for quick updates, and schedule a dedicated block of time for any necessary phone calls. Keep a record of when and how you notified each entity.
Key Insight: This isn't just about mail. Updating your address is critical for billing accuracy, emergency services, and maintaining your credit profile. Forgetting to update a single creditor can lead to missed payments and a negative impact on your credit score, making this step foundational to financial health during a move.
4. Book Moving Services and Transportation
Securing transportation is a time-sensitive, high-stakes part of the move-in process that directly impacts the smoothness of the transition. Whether opting for a full-service professional moving company or a DIY truck rental, booking well in advance is crucial. This step involves more than just scheduling a truck; it requires diligent research into company reputation, insurance coverage, and service levels to avoid costly surprises.
For landlords, providing tenants with a curated list of trusted local movers or rental services can be a valuable, low-effort addition to your welcome package. This guidance helps ensure a more organized move-in day, reducing the potential for property damage from inexperienced movers or logistical delays. This step in a move in and out checklist prevents last-minute chaos.
How to Implement a Smart Booking Strategy
The key is to start the process 4-6 weeks before the move-in date to secure better rates and availability, especially during peak moving season (May-August).
Gather Multiple Estimates: Always obtain at least three written estimates from different companies. Compare not just the price, but the services included. Examples of reputable services include national carriers like United Van Lines and North American Van Lines, regional specialists like Two Men and a Truck, or DIY options like U-Haul and PODS.
Verify Credentials: For interstate moves, confirm the company has a valid U.S. DOT number. For all movers, check recent customer reviews on independent platforms and verify their insurance and licensing credentials.
Clarify Service Details: Understand the difference between a binding estimate (a guaranteed price) and a non-binding estimate (which can change). Confirm insurance coverage limits and inquire about the cost of additional valuation protection if needed.
Key Insight: A written, signed contract is non-negotiable. It should clearly outline the pickup and delivery dates, total cost, inventory of items being moved, and specific insurance coverage. This document is your primary protection against unexpected fees or disputes.
5. Arrange for Utilities Setup and Disconnection
A seamless utility transfer is a crucial, often overlooked, part of a smooth move in and out checklist. Mishandling this step can lead to a tenant moving into a property without power or water, or a landlord being billed for a former tenant’s usage. Properly coordinating the disconnection and activation of services is essential for tenant satisfaction and financial protection.
This process involves more than just a few phone calls; it's about strategic scheduling. The goal is to create a zero-gap transition where services are active for the new tenant upon arrival and promptly removed from the vacating tenant's name, preventing any period where the unit is without essential services or where billing becomes ambiguous.
How to Implement a Utility Transfer Protocol
A systematic approach ensures nothing falls through the cracks. This should be a standard part of your tenant turnover procedure.
Provide a Utility Contact List: Give both incoming and outgoing tenants a clear list of required utility providers (e.g., Duke Energy, Comcast, local water authority) with contact information and account setup instructions.
Schedule Strategically: Advise the outgoing tenant to schedule disconnection for the end of their move-out day. Instruct the incoming tenant to schedule activation for the morning of their move-in day. This overlap prevents service gaps.
Verify and Document: Before the new tenant moves in, verify that essential services like electricity and water are active. For the outgoing tenant, recommend they take photos of meter readings on their final day as a personal record.
Key Insight: The responsibility for utility management should be clearly defined in the lease agreement. By providing clear instructions and a timeline as part of your move in and out checklist, you empower tenants to manage the process correctly, which protects your property and prevents you from having to resolve billing disputes or service interruptions.
6. Obtain or Update Insurance Coverage
A move introduces significant risk to personal belongings and liability, making insurance updates a non-negotiable part of any comprehensive move in and out checklist. Failing to notify insurers of a move can lead to coverage gaps or outright claim denials, turning a minor mishap during transit or at the new property into a major financial disaster for both tenants and landlords.
This step involves proactively communicating with all relevant insurance providers, including homeowners, renters, and auto insurers, to ensure seamless coverage. For a tenant, this means securing a new renters insurance policy for the destination address. For a landlord, it's a crucial reminder to verify that both their own property insurance is active and that the new tenant has provided proof of required renters insurance before handing over the keys.
How to Manage Insurance During a Move
Properly sequencing insurance updates prevents lapses in protection for all parties involved. It's a key risk management step in the moving process.
Notify Current Insurers: Inform your auto and property insurance providers of your new address and the exact date of the move. This is critical for updating your policy terms and premiums accurately.
Secure New Policies: Obtain quotes from multiple providers (e.g., State Farm, Allstate, GEICO) for the new property. Tenants should secure a renters policy, and landlords should confirm their dwelling policy is appropriate for a rental.
Verify Mover's Insurance: If using a professional moving company, always request their certificate of insurance. Understand their liability limits and consider supplemental moving insurance from a provider like Movers Choice for high-value items.
Document Everything: Before packing, create a detailed photo or video inventory of your belongings. This documentation is invaluable if you need to file a claim for items damaged during the move.
Key Insight: Insurance is not a "set it and forget it" task. A move is a significant life event that alters your risk profile. Proactively managing your policies ensures your assets are protected from the moment you start packing until you are fully settled, safeguarding both the tenant's possessions and the landlord's property. For a deeper dive into policy options, explore our guide to landlord insurance on mypropertymanaged.com.
7. A Strategic Packing and Labeling System: Efficiency from Start to Finish
A disorganized move creates chaos for everyone involved, but a strategic packing and labeling system can transform the process into a streamlined operation. This is more than just throwing items in boxes; it's a methodical approach that protects belongings, simplifies unpacking, and ensures a smooth transition for tenants, which reflects positively on the property manager.
This system involves categorizing items, using appropriate packing materials, and implementing a clear labeling convention. When tenants can move in and unpack efficiently without stress, it starts the tenancy on a positive note. For landlords, providing this guidance as part of a move-in packet adds value and demonstrates a commitment to a professional, organized process.

How to Implement a Strategic Packing System
Advising tenants on an effective packing strategy benefits both parties. It minimizes move-in day delays and reduces the risk of damage to the property or their belongings.
Color-Code by Room: Assign a specific color to each room (e.g., blue for the primary bedroom, yellow for the kitchen). Use colored tape or markers on the boxes so movers can instantly identify where each box goes without reading a single label.
Detailed Labeling: Each label should contain three key pieces of information: the destination room, a brief summary of contents (e.g., "Kitchen - Pots & Pans"), and the box number corresponding to an inventory list.
Master Inventory List: Create a simple spreadsheet or use a notebook to log each numbered box and its general contents. This is invaluable for tracking everything and confirming all items have arrived safely.
Key Insight: The most crucial element is the "Essentials Box." This box is packed last and opened first, containing items needed for the first 24 hours: toiletries, medications, chargers, basic tools, paper towels, and snacks. This simple step prevents a frantic search through dozens of boxes after a long moving day.
8. Clean and Inspect Old and New Residences
The transition between properties is a critical moment where your attention to detail directly impacts your finances and future living conditions. This dual-action step involves a meticulous clean-out of your former residence to secure your full security deposit and a thorough inspection of your new home to document its initial state accurately. It's a process of closing one chapter cleanly while opening another transparently.
Treating this as two distinct but connected projects is key. The goal for the old residence is to return it to the landlord in a condition that meets or exceeds lease requirements, leaving no room for deductions. Simultaneously, the inspection of the new residence establishes a clear, documented baseline, protecting you from being held responsible for pre-existing issues when you eventually move out.
How to Implement the Clean and Inspect Process
A systematic approach ensures nothing is missed, protecting your security deposit and setting a positive tone with your new landlord.
Schedule Professional Cleaning: To meet landlord expectations, consider hiring move-out cleaning specialists (e.g., The Cleaning Authority) 2-3 days before your final walkthrough. Retain the receipt as proof of professional service.
Document Everything: Take extensive, timestamped photos and videos of your old, empty apartment after it has been cleaned. This creates a visual record that can counter any potential claims. Do the same at the new residence before moving any belongings in, focusing on any existing wear and tear.
Conduct Joint Inspections: Whenever possible, complete the final move-out inspection with your old landlord present. For the new property, use a comprehensive move in and out checklist to walk through with the new property manager, having them sign off on your documented findings.
Key Insight: This process isn't just about cleaning; it's about creating an undeniable record. Detailed photographic evidence from both properties, paired with a signed inspection form from your new home, provides a powerful defense against unwarranted deposit claims and future disputes. You can learn more about crafting a perfect move-in property condition checklist on mypropertymanaged.com.
9. Update Government and Legal Documents
While not directly part of a physical property inspection, ensuring a tenant's legal and governmental documents are updated is a critical, though often overlooked, aspect of a smooth transition. For landlords, confirming a tenant has officially changed their address with state and federal agencies adds a layer of stability and legitimacy to the tenancy, simplifying official communications and legal notices.
This process involves the tenant updating their address on all essential identification and legal paperwork. Failing to do so can lead to missed jury duty summons, tax documents, or other critical mail, creating potential complications for both the tenant and the property manager. Encouraging tenants to complete these steps as part of their move-in process promotes responsible residency.
How to Systematize Document Updates
Landlords can support tenants by including a "Personal Administration" section in their welcome packet, outlining the necessary updates. This proactive step helps ensure all official correspondence will reach the tenant at their new home.
Driver's License & Vehicle Registration: Advise tenants to use their state's DMV online portal to update their address, often the quickest method. Provide a link to the relevant state website in your digital welcome materials.
Voter Registration: Emphasize the importance of updating voter registration to maintain voting eligibility in local, state, and federal elections. This can typically be done online through the state's election board website.
Professional and Property Documents: Remind tenants who hold professional licenses or own other property to notify the relevant state licensing boards and county assessor's offices of their new primary residence.
Proof of Address: Suggest that tenants use a copy of the newly signed lease agreement or a first utility bill as their official proof of address, which is required for many of these updates.
Key Insight: While the landlord's role is to manage the property, providing a simple guide for these administrative tasks demonstrates a high level of professionalism and care. It helps ensure the tenant is fully and legally established at the property, which is beneficial for a stable, long-term tenancy.
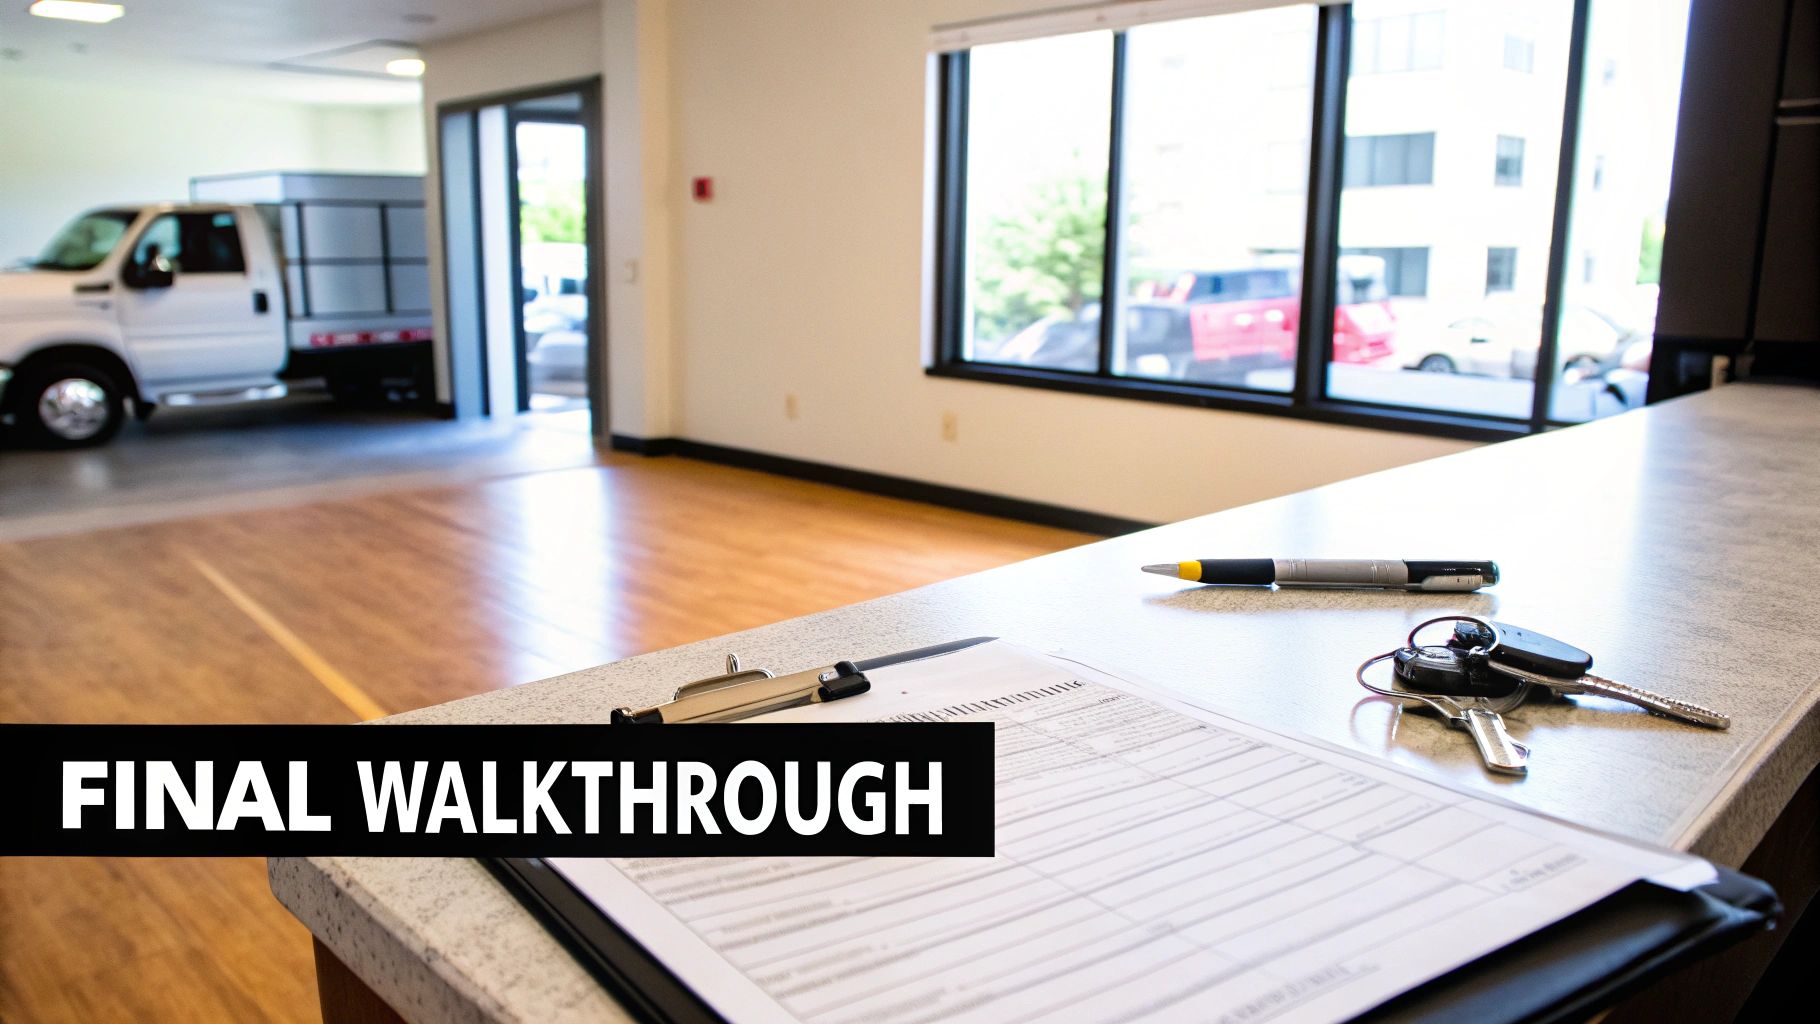
10. Conduct Moving Day Logistics and Final Walkthrough
The move-out day is the culmination of the tenancy, and a well-managed final walkthrough is your last opportunity to formally document the property's condition. This process is not just about collecting keys; it’s a critical step in finalizing the tenancy record, protecting your investment, and ensuring a fair security deposit reconciliation. A systematic approach prevents disputes and provides clear, documented closure.
This final inspection, ideally conducted with the tenant present, compares the property's current state against the initial move-in condition report. It’s a methodical verification that all personal belongings have been removed, required cleaning has been completed, and the property is being returned in the agreed-upon condition, accounting for normal wear and tear.
How to Implement a Structured Final Walkthrough
A successful move-out requires meticulous coordination and documentation, turning a potentially chaotic day into a smooth, professional process.
Coordinate with the Tenant: Schedule the final walkthrough for after the tenant has completely moved out all their belongings and finished cleaning. This ensures an unobstructed and accurate assessment.
Use the Move-In Checklist: Bring the original, signed move-in checklist to the walkthrough. Go through the property room by room, comparing the initial report to the current condition and noting any discrepancies, such as new damages or items left behind.
Document Everything: Take extensive photos and videos of each room, paying close attention to any areas of concern. Capture final utility meter readings with timestamped photos to prevent billing disputes.
Finalize Key Transfer: Once the inspection is complete and both parties have signed the final report, formally collect all keys, garage door openers, and access fobs. Do not leave the property until you have secured it. A thorough landlord checklist is invaluable for this process. For more details, explore this quick guide on what to do when a tenant moves out.
Key Insight: The final walkthrough serves as the definitive closing statement for the tenancy. By systematically comparing the property's end state to the move-in record, you create an unassailable foundation for processing the security deposit and defending against potential legal challenges.
11. Security Deposit Itemization: The Financial Finale
The security deposit itemization statement is the final, official financial document that closes out a tenancy. It's not just a receipt; it's a detailed, legally-mandated accounting of any deductions made from the tenant's deposit. A poorly executed itemization can easily lead to disputes, legal challenges, and damage to your professional reputation.
This document bridges the gap between the final move-out inspection and the return of funds. It must clearly list each deduction, connect it to a specific clause in the lease agreement, and reference the evidence gathered during the move-in and move-out inspections. A transparent, well-documented itemization protects both parties and ensures the process is fair and defensible.
How to Implement a Compliant Itemization Statement
Your itemization statement should be a model of clarity and compliance, leaving no room for ambiguity. Always check your specific state and local laws for strict timelines and requirements.
Detail Every Deduction: Vague descriptions like "Cleaning Fee" are insufficient. Instead, be specific: "Stove and Oven Deep Clean: $75," "Carpet Stain Removal (Living Room): $120," or "Repair of 3 Large Drywall Holes (Bedroom 2): $150."
Provide Proof: For each deduction, attach a copy of the corresponding invoice or receipt from the vendor who performed the work. This demonstrates that the costs are real and not arbitrary penalties.
Reference the Checklists: Explicitly connect each deduction back to your move in and out checklist. For example, note "Wall damage not present on move-in checklist, documented with photos on move-out report."
Key Insight: Treat the security deposit itemization as if it will be presented in court. Meticulous documentation, clear justification for each charge, and strict adherence to legal deadlines are your best defense against potential disputes and will solidify your reputation as a fair and professional landlord.
11-Point Move In & Out Checklist Comparison
Task | 🔄 Implementation Complexity | ⚡ Resource & Time Requirements | 📊 Expected Outcomes | 💡 Ideal Use Cases | ⭐ Key Advantages |
|---|---|---|---|---|---|
Create a Moving Timeline and Plan | Medium — structured sequencing and contingency planning | Low–Medium — calendar tools, 2–8 week planning window | Fewer last‑minute issues; reduced stress | Complex moves or households needing coordination | Prevents forgotten tasks; enables cost comparisons |
Declutter and Downsize Your Belongings | Medium–High — emotional sorting and multiple disposition steps | Time‑intensive — hours to weeks; possible selling/donation logistics | Lower volume and moving cost; easier unpacking | Cost‑sensitive moves; smaller new homes | Reduces moving costs; environmental and psychological benefits |
Notify Institutions, Change Address & Mail Forwarding | High — many organizations with varied processes | Moderate — documentation, multiple contact methods; start 3–4 weeks prior | Continuity of services; fewer missed bills/documents | Moves with many subscriptions, financial or medical accounts | Protects financial/identity security; ensures important mail delivery |
Book Moving Services and Transportation | Medium — compare estimates, insurance, scheduling | High — potential significant cost; book 4–6 weeks ahead | Professional handling; faster transit; reduced damage risk | Large, long‑distance or full‑service moves | Saves labor; offers insurance and logistical expertise |
Arrange for Utilities Setup and Disconnection | Medium–High — coordinate multiple providers and appointments | Low–Medium — calls, appointments, possible activation fees; schedule 1–3 weeks prior | Uninterrupted utilities at new home; accurate final billing | Moves needing immediate utility access on move‑in day | Ensures comfort/security continuity; prevents billing disputes |
Obtain or Update Insurance Coverage | Medium — policy review and coverage selection | Moderate — cost of premiums, documentation, quotes from providers | Financial protection during transit and at new residence | High‑value items, financed homes, professional movers | Mitigates financial loss; provides claim support and peace of mind |
Packing and Labeling System | Medium — systematic labeling, inventory and protection | Moderate — packing materials ($300–$800+), 4–6 weeks start time | Faster unpacking; fewer damages; inventory for claims | DIY moves; households needing organized unpacking | Speeds unpacking; protects items; simplifies claims |
Clean and Inspect Old and New Residences | Medium — thorough cleaning and photographic documentation | Low–Medium — time or pro fees ($200–$600+); schedule near move date | Maximized deposit return; documented pre‑existing damage | End‑of‑lease moves; property handovers | Legal protection; improves chances of full deposit return |
Update Government and Legal Documents | High — jurisdictional rules, DMV and registrations | Moderate — appointments, fees ($15–$50+), 30–60 day timelines | Legal compliance; avoids fines; ensures voter/insurance validity | Interstate moves; vehicle owners; professionals with licenses | Prevents legal/insurance issues; maintains voting and registration status |
Conduct Moving Day Logistics & Final Walkthrough | High — simultaneous coordination and documentation | High — 8–12 hours active management; oversight and verification | Ensures nothing left, confirms utilities off, documents final condition | All moves (critical for rentals and high‑value items) | Minimizes disputes; verifies inventory and final condition |
Transforming Stress into Strategy: Your Next Steps
Moving can feel like a whirlwind of boxes, deadlines, and endless to-do lists. However, navigating this complex process doesn't have to be a source of overwhelming stress. As we've detailed, the transition from one home to another can be transformed from a chaotic scramble into a streamlined, strategic operation. The key lies not in simply working harder, but in working smarter with a comprehensive framework that anticipates needs, clarifies responsibilities, and documents every critical detail.
The true power of an exhaustive move in and out checklist is its ability to serve as a shared language between landlords and tenants. It replaces ambiguity with clarity, assumptions with evidence, and potential conflict with proactive communication. This isn't just a list of tasks; it's a blueprint for a successful and respectful rental turnover.
Key Takeaways for Landlords and Tenants
For property owners and managers, implementing these detailed checklists is a fundamental act of asset protection. It’s about more than just getting the property ready for the next occupant; it’s about creating a professional, repeatable system that minimizes disputes, ensures proper maintenance, and upholds your reputation.
Landlord Insight: A well-documented move-out inspection, supported by the initial move-in report and photographic evidence, is your strongest tool in justly handling security deposit deductions and defending against potential legal challenges. It professionalizes your operation and builds a foundation of trust.
For tenants, this guide is your roadmap to a smooth exit and, most importantly, the full return of your security deposit. By meticulously documenting the property's condition upon arrival and departure, you are not just a resident; you are an empowered, informed consumer protecting your financial interests.
Your Actionable Path Forward
The value of these checklists is realized through action. Don’t let this guide become just another bookmarked article. Instead, take these immediate, concrete steps to integrate these practices into your next move:
Download and Customize: Start with the provided templates. Tailor the move in and out checklist to fit the specific features of your property or rental agreement. Add items unique to the unit, such as a fireplace, balcony, or specific appliances.
Establish a Digital Archive: Create a dedicated cloud folder (e.g., on Google Drive or Dropbox) for each tenancy. Store the signed move-in checklist, all photos and videos from the initial inspection, and any related communications. This digital-first approach ensures documents are secure, time-stamped, and easily accessible.
Integrate into Your Onboarding Process: For landlords, make the move-in inspection and checklist review a non-negotiable part of your tenant onboarding. Walk through the property with the new tenant, explaining the process and setting clear expectations for the move-out from day one.
Schedule Proactively: Don’t wait until the last minute. Whether you are a tenant providing notice or a landlord receiving it, immediately consult your timeline. Schedule the final walkthrough, professional cleaning services, and necessary repairs well in advance to avoid last-minute rush fees and scheduling conflicts.
Ultimately, mastering the move-in and move-out process is about control. It’s about taking control of your investment, your finances, and your peace of mind. By replacing guesswork with a systematic approach, you build a foundation for positive landlord-tenant relationships and ensure that every transition is handled with professionalism and fairness. This strategic mindset is what separates a stressful, costly turnover from a seamless, profitable one.
Feeling overwhelmed by the sheer volume of tasks involved in a professional rental turnover? A robust move in and out checklist is just the beginning. To ensure every step is executed flawlessly without consuming your valuable time, consider partnering with the experts at Keshman Property Management. We implement these meticulous systems every day, transforming the complexities of property management into a seamless, stress-free experience for property owners. Learn how Keshman Property Management can protect your investment and maximize your returns.

Comments